인터랙티브 자바스크립트
- Javascript
- 2021. 10. 6. 22:38

코드잇의 인터랙티브 자바스크립트를 보면서
정리한 내용입니다.
문제가 될 시 삭제하겠습니다.
인터랙티브 자바스크립트
1. 인터랙티브 자바스크립트 시작하기
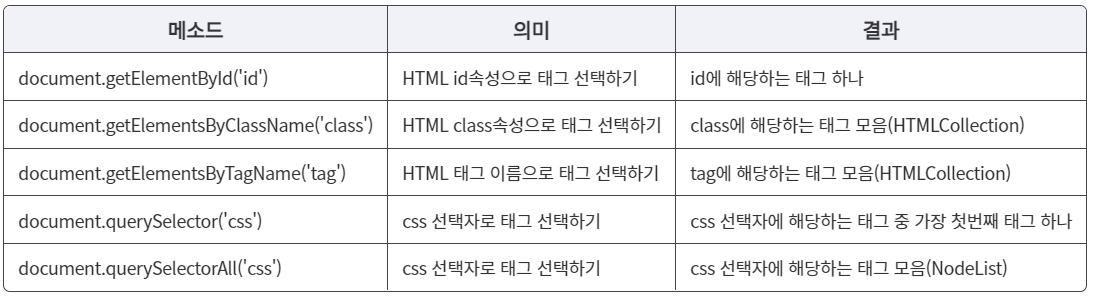
03. id로 태그 선택하기
// id로 태그 선택하기
// 존재하지 않는 id를 선택하면 null로 나옴
document.getElementById('id');
05. class로 태그 선택하기
// class로 태그 선택하기
document.getElementsByClassName('class');

// class로 태그 선택하기
const test = document.getElementsByClassName('class');
console.log(test[1]);

for (let value of test) {
    console.log(value);
}

// getElementsByClassName 메소드를 통해 존재하지 않는 class 값으로 태그를 선택하게 되면 그 값은 빈 HTMLCollelction이 됩니다
06. 유사배열 (Array-Like Object)
- 배열과 모양은 같지만, 완벽히 배열이 아닌 형태
- 숫자 형태의 indexing이 가능하다.
- length 프로퍼티가 있다.
- 배열의 기본 메소드를 사용할 수 없다.
- Array.isArray(유사배열)은 false이다.
08. 태그 이름으로 태그 선택하기
const btns = document.getElementsByTagName('button');

// 모든 태그 선택
const allTags = document.getElementsByTagName('*');
09. CSS 선택자로 태그 선택하기
// css 선택자로 태그 선택하기
const myTag = document.querySelector('#myNumber'); // 가장 위의 한개만 선택됨
console.log(myTag);

const myTag2 = document.getElementById('myNumber');
console.log(myTag2);

const myTag3 = document.querySelectorAll('.color-btn'); // 해당하는 것 모두 선택됨
console.log(myTag3);

const myTag4 = document.getElementsByClassName('color-btn');
console.log(myTag4);
11. 이벤트와 버튼 클릭
- 이벤트 : 웹 페이지에서 발생하는 대부분의 일(사건)들 ex) 버튼 클릭, 스크롤, 키보드 입력, ...
- 이벤트 핸들링 : 자바스크립트를 통해 이벤트를 다루는 일
- 이벤트 핸들러 : 이벤트가 발생했을 때 일어나야하는 구체적인 동작들을 표현한 코드. 이벤트 리스너(Event Listener)라고도 부른다.
- 버튼 클릭 시 로그가 출력됨
// 이벤트(Event)와 버튼 클릭
const btn = document.querySelector('#myBtn');

// 이벤트 핸들러를 등록하는 2가지 방법
// 1. onclick 프로퍼티에 함수를 할당
btn.onclick = function() { // 이벤트 핸들러
    console.log('Hello Codeit!');
}

// 2. HTML 태그의 onclick 속성에 바로 표시하기
<button id="myBtn" onclick="console.log('Hello Codeit!')">클릭!</button>
2. 브라우저와 자바스크립트
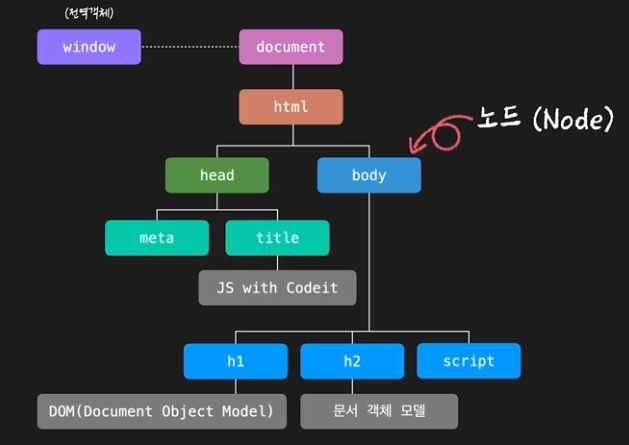
01. 브라우저도 객체다?
- window 객체는 자바스크립트의 최상단 객체
- window 객체가 자바스크립트의 모든 것을 포함하고 있음
- window 객체는 자바스크립트 어느 곳에서나 접근 가능
- window 객체는 전역객체임
// window
console.log(window);
console.log(window.innerWidth);
console.log(window.innerHeight);
02. DOM(Document Object Model)
- 문서 객체 모델
console.log(document);
console.log(typeof document);
console.dir(document); // property가 출력되는 모습을 볼 수 있음const title = document.querySelector('#title');
title.style.color = 'red';03. console.dir?
- console.log와 console.dir의 다른점
- 출력하는 자료형이 다르다.
- dir 메소드는 문자열 표시 형식으로 콘솔에 출력한다.
- log는 값 자체에, dir은 객체 속성에
- log는 파라미터로 전달받은 값을 위주로 출력한다.
- dir은 객체의 속성을 좀 더 자세하게 출력한다. (클릭하면 함수가 가진 속성들을 더 보여줌)
- 파라미터로 전달할 수 있는 값의 개수에도 차이가 있다. log는 여러개 출력, dir은 여러개 입력해도 하나만 출력!
- DOM 객체를 다룰 때
- log는 HTML 형태로 출력하고, dir 메소드는 대상 객체 형태로 출력함
const myDOM = document.body;

console.log(myDOM);
console.dir(myDOM);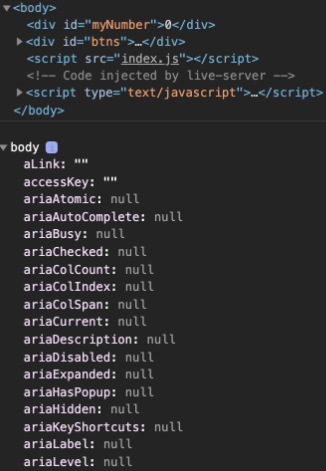
04. DOM 트리 (Document Object Model)
- 부모노드-자식노드 : 노드가 위 아래로 위치
- 형제노드 : 노드가 같은 선상에 위치
05. DOM 트리 여행하기
const myTag = document.querySelector('#content');
console.log(myTag);

// 형제 요소 노드
console.log(myTag.previousElementSibling);
console.log(myTag.nextElementSibling);

// 부모 요소 노드
console.log(myTag.parentElement);

// 자식 요소 노드
console.log(myTag.children[1]); // 해당 요소의 자식 노드
console.log(myTag.firstElementChild); // 자식들 중 가장 첫번째 요소
console.log(myTag.lastElementChild); // 자식들 중 가장 마지막 요소
08. 요소 노드 프로퍼티
// 요소 노드 주요 프로퍼티
const myTag = document.querySelector('#list-1');

// innerHTML : 요소 안에 잇는 HTML을 문자열로 return 함 (태그, 들여쓰기 모두 포함함)
console.log(myTag.innerHTML);

// innerHTML 로 요소를 추가할 수도 있음
myTag.innerHTML += '<li>Exotic</li>';

// innerHTML 로 요소를 변경할 수도 있음
myTag.innerHTML = '<li>Exotic</li>';

// outerHTML : 바깥 요소까지 포함되된 HTML 문자열을 return 함
console.log(myTag.outerHTML);

// textContent : 텍스트만 다룸, <li> 요소 같은 것을 사용할 수 없음
console.log(myTag.textContent);
myTag.textContent = '<li>new text!</li>';
11. 요소 노드 추가하기
// 요소 노드 추가하기
const tomorrow = document.querySelector('#tomorrow');

// 1. 요소 노드 만들기: document.createElement('태그이름')
const first = document.createElement('li');

// 2. 요소 노드 꾸미기 : textContent, innerHTML, ...
first.textContent = '처음';

// 3. 요소 노드 추가하기 : Node.prepend, append, after, before
tomorrow.prepend(first);

const last = document.createElement('li');
last.textContent = '마지막';
tomorrow.append(last);

const prev = document.createElement('p');
last.textContent = '이전';
tomorrow.append(prev); // 혹은 tomorrow.append('문자열') 도 가능

const prev = document.createElement('p');
last.textContent = '다음';
tomorrow.append(prev);
12. 노드 삭제와 이동하기
// 노드 삭제와 이동
const today = document.querySelector('#today');
const tomorrow = document.querySelector('#tomorrow');

// 노드 삭제하기: Node.remove();
tomorrow.remove();
today.children[2].remove();

// 노드 이동하기: prepend, append, before, after
today.append(tomorrow.children[1]);
tomorrow.children[1].after(today.children[1]);
tomorrow.children[2].before(today.children[1]);
tomorrow.lastElementChild.before(today.children[1]);
13. 오늘 꼭 해야할 일 !
li태그이름을 가진 요소 노드를 만든 다음- 그 요소 노드에 파라미터로 전달받은 오늘 할 일(
text)을 담고 <ul id="to-do-list"></ul>태그의 마지막 자식 요소 노드로 추가하는 함수
const toDoList = document.querySelector('#to-do-list');

function addNewTodo(text) {
    // 여기에 코드를 작성해 주세요.
    const tag = document.createElement('li');
    tag.textContent = text;
    toDoList.append(tag);
}

// 테스트 코드
addNewTodo('자바스크립트 공부하기');
addNewTodo('고양이 화장실 청소하기');
addNewTodo('고양이 장난감 쇼핑하기');
14. HTML 속성 다루기
const tomorrow = document.querySelector('#tomorrow');
const item = tomorrow.firstElementChild;
const link = item.firstElementChild;

// elem.getAttribute('속성'): 속성에 접근하기
console.log(tomorrow.getAttribute('href'));
console.log(item.getAttribute('class'));

// elem.setAttribute('속성', '값'); 속성 추가(수정)하기
tomorrow.setAttribute('class', 'list');
link.setAttribute('href', 'https://www.colde.kr');

// elem.removeAttribute('속성') : 속성 제거하기
tomorrow.removeAttribute('href');
tomorrow.removeAttribute('class');
16. 스타일 다루기
// 스타일 다루기
const today = document.querySelector('#today');
const tomorrow = document.querySelector('#tomorrow');

console.log(today.classList);
conole.log(today.children[1].classList;);

// class 속성의 값을 통채로 바꾸려면 className
today.children[1].className = 'done'; // .done 이라는 style class 미리 작성해두고, className을 추가

// class 속성의 내용을 부분적으로 바꾸려면 classList
// elem.classList : add, remove, toggle
item.classList.add('done', 'other'); // done과 other class 추가
item.classList.remove('done', 'other'); // done과 other class 삭제
item.classList.toggle('done'); // done 클래스가 있으면 제거하고, 없으면 붙임

// style 프로퍼티
today.children[0].style.textDecoration = 'line-through'; // 중간에 밑줄 긋기
today.children[0].style.backgroundColor = '#DDDDDD';
3. 이벤트 살펴보기
01. 이벤트 핸들러 등록하기
let btn = document.querySelector('#myBtn');
// 이벤트 핸들러 등록하는 방법
btn.onclick = function () {
    console.log('Hi again!');
}

function event1() {
    console.log("hi!');
}

function event2() {
    console.log("hello!');
}

// 이벤트 핸들러 등록 시 권장되는 방법
btn.addEventListenner('click', event1); // event1 처럼 함수명만 넣으면됨, event1() 로 쓰면 함수를 실행하라는 의미가 됨
btn.addEventListenner('click', event2);

// 이벤트 핸들러 삭제하기
btn.removeEventListenr('click', event2);
02. 다양한 이벤트
마우스 이벤트
- mousedown(마우스 버튼을 누르는 순간),
- mouseup(마우스 버튼을 눌렀다 떼는 순간),
- click(왼쪽 버튼을 클릭한 순간),
- dbclick(더블클릭한 순간),
- contextmenu(오른쪽 버튼을 클릭한 순간),
- mousemove(마우스를 움직인 순간),
- mouseover(마우스 포인터가 요소 위로 올라온 순간),
- mouseout(마우스 포인터가 요소에서 벗어나는 순간),
- mouseenter(마우스 포인터가 요소위로 올라온 순간(버블링이 일어나지 않음)),
- mouseleave(마우스 포인터가 요소에서 벗어나는 순간 (버블링이 일어나지 않음)
키보드 이벤트
- keydown : 키보드의 버튼을 누르는 순간
- keypress : 키보드의 버튼을 누르는 순간(a, 5 등 출력이 가능한 키에서만 동작하고, shift, esc 등의 키에서는 반응하지 않음
- keyup : 키보드의 버튼을 눌렀다 떼는 순간
포커스 이벤트
- focusin (요소에 포커스가 되는 순간)
- focusout ( 요소로부터 포커스가 빠져나가는 순간)
- focus : 요소에 포커스가 되는 순간 (버블링이 일어나지 않음)
- blur : 요소로부터 포커스가 빠져나가는 순간 (버블링이 일어나지 않음)
입력 이벤트
- change : 입력된 값이 바뀌는 순간
- input : 값이 입력되는 순간
- select : 입력 양식의 하나가 선택되느 순간
- submit : 폼을 전송하는 순간
스크롤 이벤트
- scroll : 스크롤바가 움직일 때
윈도우 창 이벤트
- resize : 윈도우 사이즈를 움직일 때 발생
04. 이벤트 객체
- 웹 페이지에서 이벤트가 발생하면 관련 정보를 담은 이벤트 객체가 만들어지고, 이벤트 핸들러의 첫번째 파라미터로 전달됨
// 이벤트 객체
const myInput = document.querySelector('#myInput');
const myBtn = document.querySelector('#myBtn');

function prientEvent(event){ // 보통 event 대신 e로 사용함
    console.log(event);
}

// 이벤트 핸들러가 되는 함수의 첫번째 파라미터에는 이벤트 객체가 전달됨
myInput.addEventListener('keydown', printEvent);
myBtn.addEventListener('click', printEvent);
05. 이벤트 객체 프로퍼티
1. 공통 프로퍼티
- type : 이벤트 이름( click, mouseup, keydown 등)
- target : 이벤트가 발생한 요소
- currentTarget : 이벤트 핸들러가 등록된 요소
- timeStamp : 이벤트가 발생한 시각( 페이지가 로드 된 이후부터 경과한 밀리초)
- bubbles : 버블리이 단계인지를 판단하는 값
2. 마우스 이벤트
- button : 누른 마우스의 버튼 (0:왼쪽, 1:가운데, 2:오른쪽)
- clientX, clientY : 마우스 커서의 브라우저 표시 영역에서의 위치
- pageX, pageY : 마우스 커서의 문서 영역에서의 위치
- offsetX, offsetY : 마우스 커서의 이벤트 발생한 요소에서의 위치
- screenX, screenY : 마우스 커서의 모니터 화면 영역에서의 위치
3. 키보드 이벤트
- key : 누른 키가 가지고 있는 값
- code : 누른 키의 물리적인 위치
- altKey : 이벤트가 발생할 때 alt 키를 눌렀는지
- ctrlKey: 이벤트가 발생할 때 ctrl키를 눌렀는지
- shiftKey: 이벤트가 발생할 때 shift키를 눌렀는지
- metaKey : 이벤트가 발생할 때 meta키를 ㅜㄹ렀는지
06. 완료한 일 체크하기
<!DOCTYPE html>
<html lang="ko">
<head>
  <meta charset="UTF-8">
  <title>오늘 할 일</title>
  <link rel="stylesheet" href="style.css">
</head>
<body>
  <div class="main">
    <h2 class="title">오늘 할 일</h2>
    <ul id="to-do-list" class="to-do-list">
      <li>자바스크립트 공부하기</li>
      <li>고양이 화장실 청소하기</li>
      <li>고양이 장난감 쇼핑하기</li>
    </ul>
  </div>
  <script src="index.js"></script>
</body>
</html>
const toDoList = document.querySelector('#to-do-list');
const items = toDoList.children;
// 1. updateToDo 함수를 완성해 주세요.
function updateToDo(event) {
event.target.classList.toggle('done');
}
// 2. 반복문을 활용해서 각 li태그에 이벤트 핸들러를 등록해 주세요.
for (let item of items) {
item.addEventListener('click', updateToDo);
}
// 테스트 코드
items[2].removeEventListener('click', updateToDo);07. 이벤트 버블링
- window 객체를 만날 때 까지 자식요소 → 부모 요소까지 event 가 실행
- 이벤트 객체의 e.stopPropagation(); 을 사용하면 버블링을 막을 수 있음
- 가급적 피하는 것이 좋음
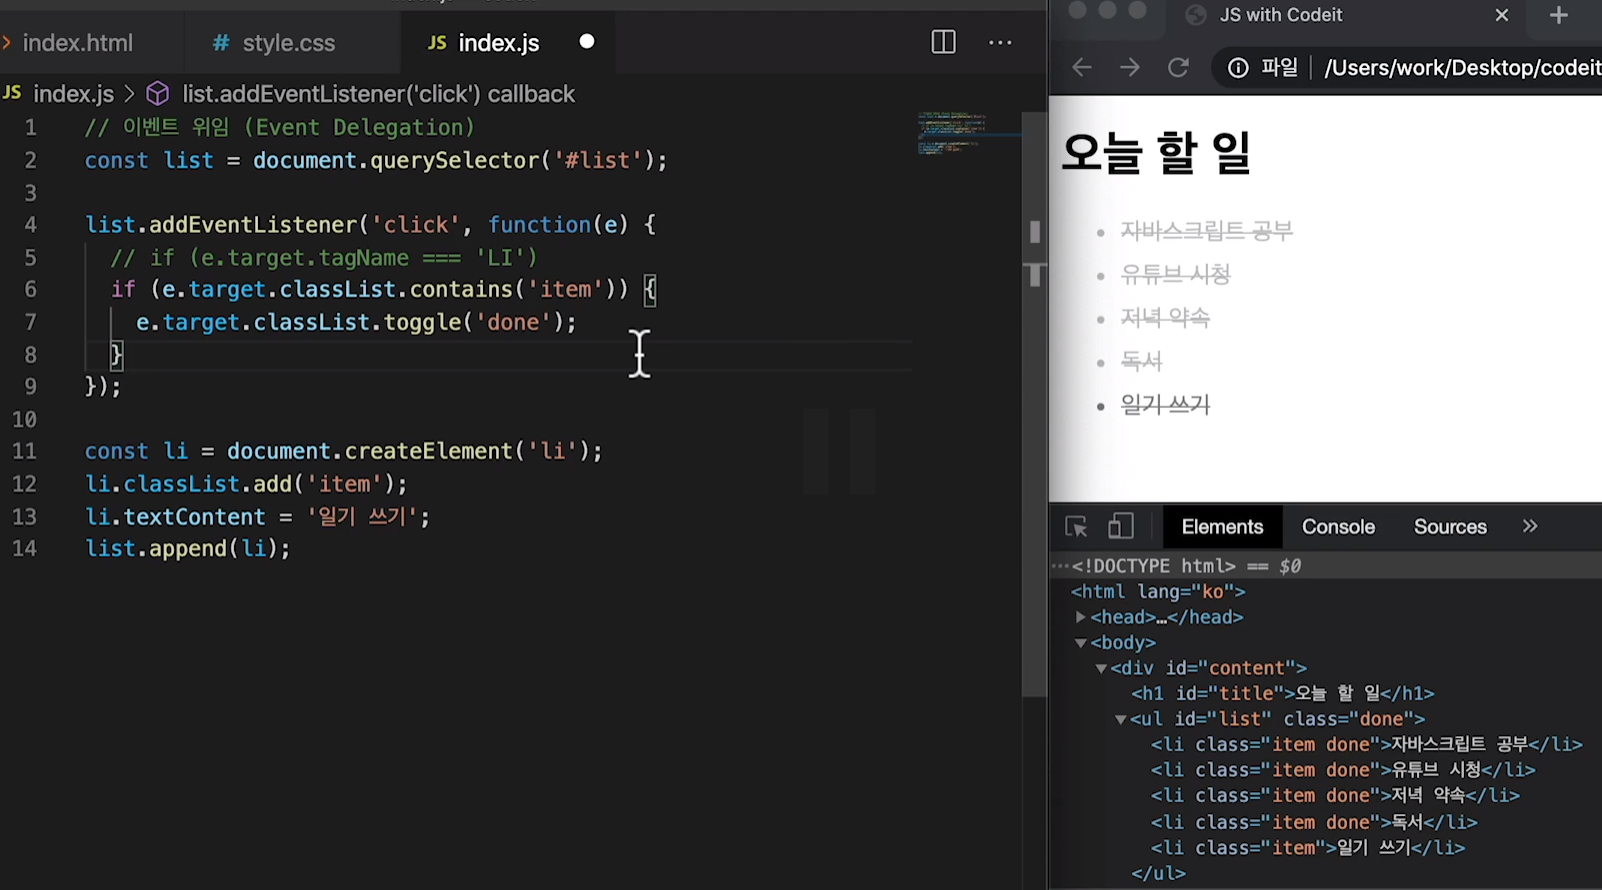
10. 이벤트 위임
- 버블링에 따라서 부모에 등록하면, 자식을 클릭할 때 부모인 list 에 적용한 이벤트 핸들러가 실행됨
// 이벤트 위임 (Event Delegation)
const list = document.querySelector('#list');

list.addEventListener('click', function(e) {
    e.target.classList.toggle('done');
});- 위와 같이하면 list에도 done 이 생기므로, 아래와 같이 list의 item에만 적용되도록 해야함
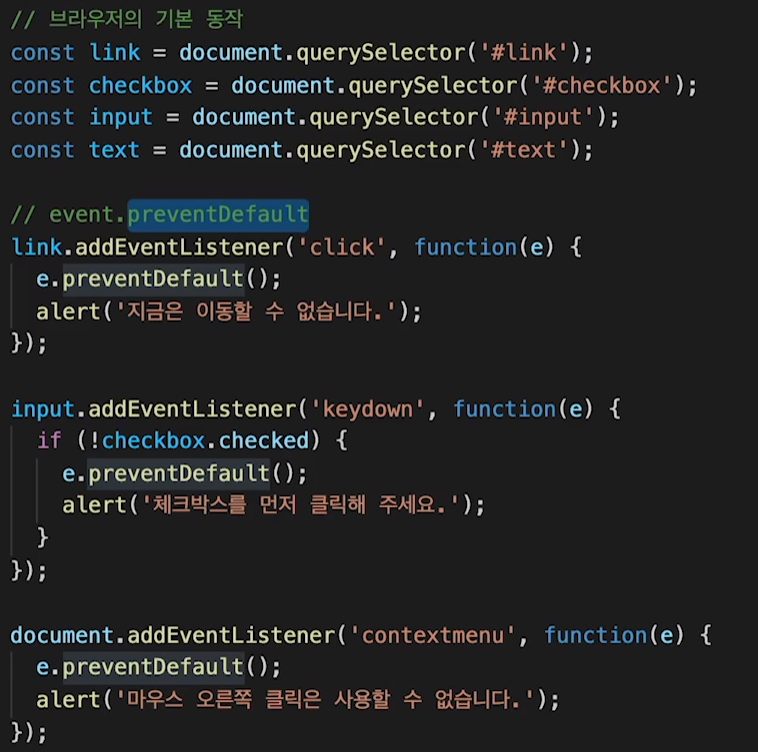
12. 브라우저의 기본 동작
- 특정 이벤트가 발생했을 때 이루어지는 브라우저의 기본적인 동작들은 이벤트 객체의 preventDefault 메소드를 통해 막을 수가 있습니다.
14. 종합정리
1. 이벤트 핸들러 등록하기
HTML의 속성이나 DOM 프로퍼티를 활용해 이벤트를 등록하는 방법 외에 Element.addEventListener('type', 'handler')를 통해서 이벤트 핸들러를 등록할 수 있습니다.
2. 이벤트 핸들러 삭제하기
addEventListener 메소드를 활용해서 이벤트 핸들러를 등록했다면, Element.removeEventListner('type', 'handler')를 통해서 이벤트 핸들러를 삭제할 수 있습니다.
3. 이벤트 객체 (Event Object)
이벤트가 발생하면 이벤트 핸들러의 첫 번째 파라미터에는 자동으로 이벤트 객체가 전달됩니다.
이벤트 객체는 이벤트 종류마다 가지고 있는 프로퍼티가 다르며, 이벤트에 대한 유용한 정보들을 프로퍼티로 가지고 있습니다.
4. 이벤트 버블링 (Event Bubbling)
이벤트는 전파가 됩니다.
어떤 요소에서 이벤트가 발생하면 해당 요소에 등록된 이벤트 핸들러가 동작하는 것뿐만 아니라 부모 요소로 이벤트가 계속해서 전파되면서 각 요소에도 등록된 이벤트 핸들러가 있다면 차례로 이벤트 핸들러가 동작하는데요.
자식 요소에서 부모 요소로 이벤트가 전파되는 것을 이벤트 버블링(Event Bubbling)이라고 부릅니다.
참고로 이벤트 버블링은 이벤트 객체의 stopPropagation 메소드로 전파를 막을 수 있습니다.
5. 이벤트 위임 (Event Delegation)
버블링 개념을 활용하면 훨씬 효과적인 이벤트 관리를 할 수 있습니다. 예를 들어 자식 요소 각각에 이벤트 핸들러를 하나씩 등록할 필요 없이 부모 요소에서 한 번에 자식 요소들에 발생한 이벤트를 관리할 수도 있는데요.
이렇게 이벤트를 다루는 방식을 자식 요소의 이벤트를 부모 요소에 위임한다고 해서 이벤트 위임(Event Delegation)이라고 부릅니다.
이벤트 위임을 잘 활용하면 훨씬 더 효율적으로 이벤트를 다룰 수 있습니다.
6. 브라우저의 기본 동작
브라우저에는 각 태그별 혹은 상황별로 기본적으로 약속된 동작들이 있습니다.
예를 들어 마우스 오른쪽 버튼을 클릭하면 상황에 맞는 메뉴 창이 뜬다거나, input 태그에 커서를 두고 키보드 키를 누르면 해당 값이 입력된다거나..
그런데 만약 이러한 동작들을 막고 싶다면 이벤트 객체의 preventDefault 메소드를 통해 막을 수가 있습니다.
하지만 각 HTML 태그들이 가지고 있는 고유한 역할과 의미를 훼손하게 될 수도 있기 때문에 꼭 필요한 경우에만 주의해서 사용해야 한다는 점. 꼭 기억해 주세요 :)
다양한 이벤트 알아보기
01. 마우스 버튼 이벤트
// MouseEvent.button
0 : 마우스 왼쪽버튼
1 : 마우스 휠
2 : 마우스 오른쪽 버튼

// MouseEvent.type
// click : 마우스 왼쪽 버튼을 눌렀을 때
// contextmenu : 마우스 오른쪽 버튼을 눌렀을 때
// dbclick : 동일한 위치에서 빠르게 두번 click
// mousedown : 마우스 버튼을 누른 순간
// mouseup : 마우스 버튼을 눌렀다 뗀 순간 - 더블클릭 시

03. 마우스 이동 이벤트 1
[마우스 이동 이벤트]
MouseEvent.type
mousemove : 마우스 포인터가 이동할 때
mouseover : 마우스 포인터가 요소 밖에서 안으로 이동할 때
mouseout : 마우스 포인터가 요소 안에서 밖으로 이동할 때

MouseEvent.clientX, clientY
화면에 표시되는 창 기준 마우스 포인터 위치
그 순간 보여지는 화면을 기준으로 계산하기 때문에 스크롤 위치와는 무관하게 항상 보여지는 화면의 좌측 상단의 모서리 위치를 (0, 0)으로 계산

MouseEvent.pageX, pageY
웹 문서 전체 기준 마우스 포인터 위치
스크롤로 인해서 보이지 않게된 화면의 영역까지 포함해서 측정한다는 점

MouseEvent.offsetX, offsetY
이벤트가 발생한 요소 기준 마우스 포인터 위치
스크롤 위치와는 무관하게 항상 대상의 좌측 상단의 모서리 위치를 (0, 0)으로 계산

const box1 = document.querySelector('#box1');

function onMouseMove(e) {
    console.log('mouse is moving!');
    console.log('client: (${e.clientX}, ${e.clientY})');
    console.log('page: (${e.clientX}, ${e.clientY})');
    console.log('offset: (${e.offsetX}, ${e.offsetY})');
}

box1.addEventListener('mousemove', onMouseMove);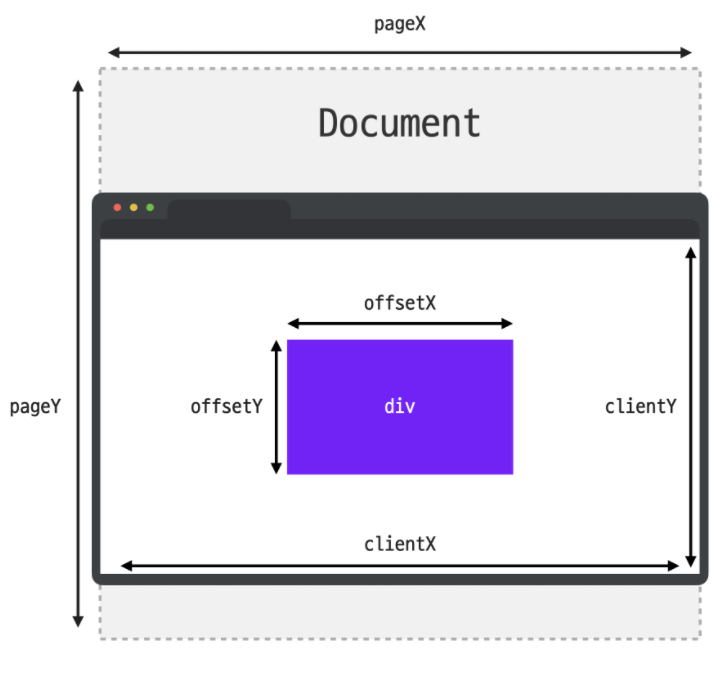
03. 마우스 이동 이벤트 2
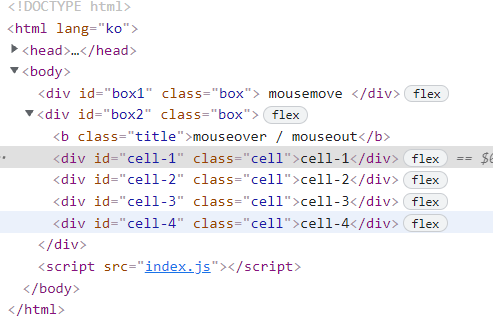
const box1 = document.querySelector('#box2');

function printEventData(e) {
    if (e.target.classList.contains('cell')) { // #box2의 class="box" 가 잡히므로 버블링이 일어나기 때문에
            e.target.classList.toggle('on');
    }
}

box2.addEventListener('mouseover', printEventData);
box2.addEventListener('mouseout', printEventData);
// MouseEvent.target
// 이벤트가 발생한 요소
// MouseEvent.relatedTarget
// 이벤트가 발생하기 직전(또는 직후)에 마우스가 위치해 있던 요소
const box2 = document.querySelector('#box2');
function printEventData(e) {
console.log('event:', e.type);
console.log('target:', e.target);
console.log('relatedTarget:', e.relatedTarget);
}
box2.addEventListener('mouseover', printEventData);
box2.addEventListener('mouseout', printEventData);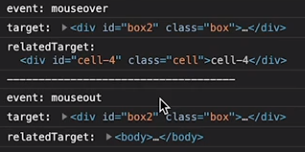
- mouseover의 relatedTarget 은 마우스가 이동하기 직전의 target
- mouseout의 relatedTarget 은 마우스가 이동한 직후의 target
06. mouseenter / mouseleave
mouseover/mouseout과 비교하면서 mouseenter/mouseleave에 대해 살펴봤는데요.
간단하게 정리하면, 이벤트가 자식 요소에 영향끼치는지가 둘의 가장 큰 차이라고 할 수 있습니다.

그래서 이벤트 핸들러가 자식 요소에까지 영향을 끼치게 하고싶은 경우에는 mouseover/mouseout을,
자식 요소에는 영향을 끼치지 않고 해당 요소에만 이벤트 핸들러를 다루고자 한다면 mouseenter/mouseleave를 활용
07. 효준이네 집
// showTitle 함수를 완성해 주세요.
function showTitle(e) {
    // 여기에 코드를 작성해 주세요.
  if (e.target.dataset.title) {
    const span = document.createElement('span');
    span.classList.add('title');
    span.textContent = e.target.dataset.title;   // 자바스킙트로 HTML 태그의 비표준 속성 활용할 때 HTML 태스에 data-* 형태로 속성을 작성하고 자바스크립트로는 DOM의 dataset 프로퍼티를 활용
    e.target.append(span);
    console.log(span);
  }
}

// removeTitle 함수를 완성해 주세요.
function removeTitle(e) {
    // 여기에 코드를 작성해 주세요.
  if (e.target.dataset.title) {
    e.target.lastElementChild.remove();
  }
}

const map  = document.querySelector('.map')

// '대상'과 '타입'을 수정해 주세요.
map.addEventListener('mouseover', showTitle);
map.addEventListener('mouseout', removeTitle);
08. 키보드 이벤트
> KeyboardEvent.type
* keydown: 키보드 버튼을 누른 순간
* keypress: 키보드 버튼을 누른 순간
* keyup : 키보드 버튼을 눌렀다 뗀 순간

> KeyboardEvent.key  // Shift
: 이벤트가 발생한 버튼의 값

> KeyboardEvent.code  // ShiftRight
: 이벤트가 발생한 버튼의 키보드에서 물리적인 위치
09. 똑Talk한 Enter키!
const chatBox = document.querySelector('#chat-box');
const input = document.querySelector('#input');
const send = document.querySelector('#send');

function sendMyText() {
  const newMessage = input.value;
  if (newMessage) {
    const div = document.createElement('div');
    div.classList.add('bubble', 'my-bubble');
    div.innerText = newMessage;
    chatBox.append(div);
  } else {
    alert('메시지를 입력하세요...');
  }

  input.value = '';
}

send.addEventListener('click', sendMyText);

function sendMyTextByEnter (e) {
  if (e.key === 'Enter' && !e.shiftKey) { //  이벤트 객체의 프로퍼티에는 shiftKey라는 프로퍼티가 있습니다. 이 프로퍼티는 이름 그대로 이벤트가 발생할 때 shift키를 눌렀는지를 불린 형태로 담고 있음
    sendMyText();
    e.preventDefault(); // sendMyText 함수 실행 후 원래 Enter의 기본 기능이 실행되기 때문에 브라우저의 기본 동작을 막는 방법인 preventDefault 를 실행
  }
}

input.addEventListener('keypress', sendMyTextByEnter);
10. input 태그 다루기
// input 태그 다루기

> focus 이벤트
* focusin: 요소에 포커스가 되었을 때
* focusout: 요소에 포커스가 빠져나갈 때
* focus: 요소에 포커스가 되었을 때 (버블링 x)
* blur: 요소에 포커스가 빠져나갈 때 (버블링 x)

> 입력 이벤트
* input : 사용자가 입력을 할 때
* change: 요소의 값이 변했을 때

const el = document.querySelector('#username');

function printEventType(e) {
    console.log('type:', e.type);
    console.log('target:', e.target);
    console.log('-------------------');
}

el.addEventListener('focusin', printEventType);
el.addEventListener('focusout', printEventType);
el.addEventListener('input', printEventType);
el.addEventListener('change', printEventType);
12. scroll 이벤트
// Scroll 이벤트
function printEvent(e) {
    console.log(e);
    console.log(window.scrollY); // 몇 픽셀
}

window.addEventListener('scroll', printEvent);