Fluentd란? Fluentd 사용법
- Fluentd
- 2021. 8. 27. 23:29
Fluentd란? Fluentd 사용법

1. Fluentd 란 ?
로그를 수집할 수 있는 로그 수집기 입니다.
Fluentd에서는 서버에 쌓이고 있는 log 파일을 지정하여 로그를 수집하도록 할 수 있습니다. 또는 http, tcp 통신하여 Fluentd로 직접 전송하는 방식도 사용할 수 있습니다.
이렇게 Fluentd에서 수집한 로그를 가공(로그에 값 추가 혹은 삭제, 필터 등) 할 수 있으며, 이를 파일이나 데이터베이스로 저장하거나 전송할 수 있습니다.
2. Fluentd 사용방법
Fluentd는 Input, Parser, Engine, Filter, Buffer, Ouput, Formatter 7개의 컴포넌트로 구성이 되어있습니다.
7개의 컴포넌트중 Engine을 제외한 나머지 6개는 플러그인 형태로 제공이 되서 사용자가 설정이 가능합니다.
일반적인 흐름은 Input → Engine → Output 의 흐름으로 이루어 지고, Parser, Buffer, Filter, Formatter 등은 Optional 하여 필요에 따라 사용할수도 있고, 사용하지 않을 수도 있습니다.
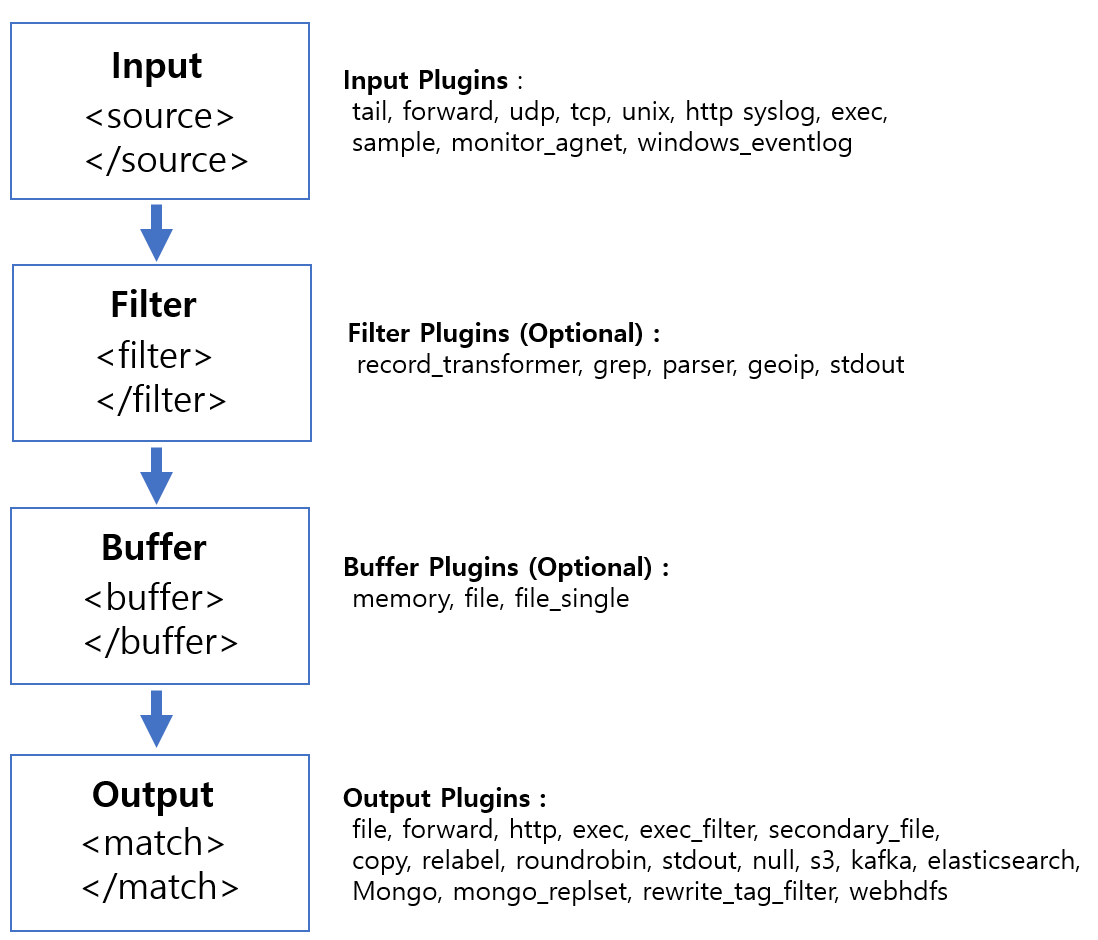
2-1. Input
- 수집할 log를 <source></source> 내부에서 input plugin(tail, forward, http등)을 사용해서 가져옵니다.
@tail
- path 에 지정한 log를 읽어서 사용합니다. 리눅스 tail 명령어와 같이, 파일의 끝부분을 지속적으로 읽습니다.
<source>
  @type tail
  path /var/log/httpd-access.log
  pos_file /var/log/td-agent/httpd-access.log.pos
  tag apache.access
  <parse>
    @type apache2
  </parse>
</source>
@forward
- 데이터를 전달받기 위해 사용하며, 서버간에 TCP로 로그 데이터를 수신할 수 있습니다.
- forward로 전달되는 데이터는 json 이나 messagepack 형식으로 되어 있습니다.
<source>
  @type forward
  port 24224
  bind 0.0.0.0
</source>
@http
- curl 같은 명령어로 로그데이터를 http 요청으로 받을 수 있습니다.
<source>
  @type http
  port 9880
  bind 0.0.0.0
  body_size_limit 32m
  keepalive_timeout 10s
</source>
2-2. filter (Optional)
- filter 를 통해 특정 데이터만 지정해서 output으로 보내거나, 데이터에 필드 값을 추가하거나 삭제할 수 있습니다.
- <filter></filter> 내부에서 filter plugin(record_transformer, grep 등)을 사용합니다.
@record_transformer
- output으로 보내기 전에 source 의 log에 hostname을 key 로, #{Socket.gethostname} 를 value 로 추가합니다.
<filter foo.bar>
  @type record_transformer
  <record>
    hostname "#{Socket.gethostname}"
  </record>
</filter>
@grep
- <source> 에서 tar가 foo.bar 로 설정되어 읽어온 log 중에,
- message filed의 값에 cool 이 있는 경우 만 grep 해서 output으로 보냅니다.
- hostname field 값이 web.example.com 과 일치하는 경우에만 output으로 보냅니다.
- message field 값에 uncool이 없는 경우에만 output으로 보냅니다.
<filter foo.bar>
  @type grep

  <regexp>
    key message
    pattern /cool/
  </regexp>

  <regexp>
    key hostname
    pattern /^web\d+\.example\.com$/
  </regexp>

  <exclude>
    key message
    pattern /uncool/
  </exclude>
</filter>
@parser
- expression 의 정규식에 일치하는 log가 있는 경우 오른쪽 정규식 내용으로 변경해서 output 으로 보냅니다.
<filter foo.bar>
  @type parser
  key_name log
  <parse>
    @type regexp
    expression /^(?<host>[^ ]*) [^ ]* (?<user>[^ ]*) \[(?<time>[^\]]*)\] "(?<method>\S+)(?: +(?<path>[^ ]*) +\S*)?" (?<code>[^ ]*) (?<size>[^ ]*)$/
    time_format %d/%b/%Y:%H:%M:%S %z
  </parse>
</fil
2-3. buffer (Optional)
- <match></match> 에서 <buffer></buffer>를 사용하여 input 에서 들어온 log를 특정데이터 크기 제한까지 도달하면 output으로 보내도록 할 수 있습니다.
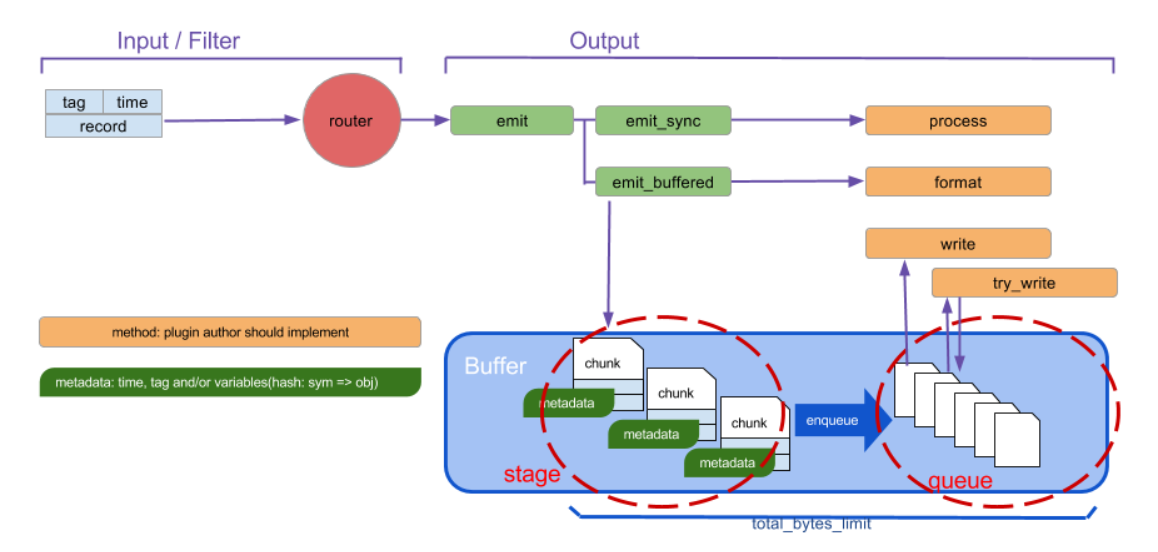
참고 : https://blog.daum.net/art_code/678219, https://docs.fluentd.org/configuration/buffer-section, https://bcho.tistory.com/1115
2-4. output
- 출력할 log를 <match></match> 내부에서 output plugin(file, stdout, forward등)을 사용해서 출력합니다.
@file
- log를 지정한 path 에 gzip 으로 압축하여 출력합니다.
<match pattern>
  @type file
  path /var/log/fluent/myapp
  compress gzip
  <buffer>
    timekey 1d
    timekey_use_utc true
    timekey_wait 10m
  </buffer>
</match>
@stdout
- Fluentd 에서 표준출력(stdout)으로 출력합니다.
<match **>
    @type stdout
</match>
@forward
- 다른 Fluentd 노드로 로그를 전달할 때 사용되며, 반드시 1개 이상을 포함해야 합니다.
<match **>
  @type forward

  <server>
    name another.fluentd1
    host 127.0.0.1
    port 24224
    weight 60   # 로드밸런싱 가중치 설정
  </server>
  <server>
    name another.fluentd2
    host 127.0.0.1
    port 24225
    weight 40
  </server>
</match>
2-5 Parser (Optional)
- <source><source>, <match><match>, <filter></filter> 안에서 <pasre></parse> 형식으로 사용합니다.
- 전달받은 데이터를 파싱하기 위해서 @type 파라미터로 regexp, apache2, apache_error, nginx, syslog, csv, tsv, ltsv, json, multiline, none 과 같은 Parser plugin을 사용합니다.
2-6. Formatter (Optional)
- <match></match> 안에서 <format></format> 형식으로 사용합니다.
- 출력 형식을 변경 할 수 있습니다. @type 파라미터로 out_file, json, ltsv, csv, msgpack, hash, single_value, tsv 와 같은 Formatter plugin 을 사용합니다.